I’ve been experimenting with gluten-free baking lately, and one of my favorite creations is a peppermint bark cookie made with almond flour. The combination of nutty flavor and festive peppermint really stands out. Plus, they remain soft and chewy, which is a bonus. If you’re curious about the exact steps or looking for some variations, you might find a few surprises in what’s to come.
What kind of recipe is it?

The Gluten-Free Peppermint Bark Cookie is a delightful treat that combines the rich flavors of chocolate with the refreshing essence of peppermint, perfect for the holiday season.
This recipe caters to those with gluten sensitivities, ensuring everyone can enjoy a festive dessert.
With its simple ingredients and easy preparation, it appeals to novice bakers and seasoned chefs alike.
Indulging in these cookies not only satisfies sweet cravings but also brings a touch of seasonal cheer, making them ideal for gatherings or personal enjoyment.
Preparation Time
| Detail | Description |
|---|---|
| Difficulty of the Recipe | Easy |
| Preparation Time | 30 minutes |
| Number of Servings | 24 cookies |
Ingredients
| Ingredient | Quantity |
|---|---|
| Gluten-free all-purpose flour | 2 cups |
| Granulated sugar | 3/4 cup |
| Unsweetened cocoa powder | 1/2 cup |
| Baking powder | 1 teaspoon |
| Baking soda | 1/2 teaspoon |
| Salt | 1/4 teaspoon |
| Unsalted butter (softened) | 1/2 cup (1 stick) |
| Large eggs | 2 |
| Vanilla extract | 1 teaspoon |
| Peppermint extract | 1/2 teaspoon |
| Semi-sweet chocolate chips | 1 cup |
| White chocolate chips | 1 cup |
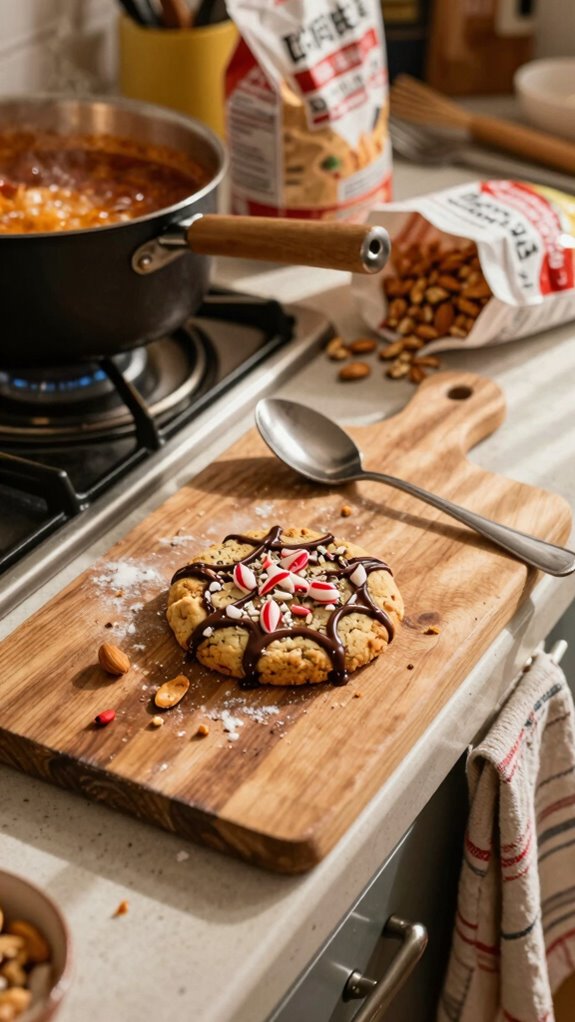
| Crushed candy canes (for topping) | 1/2 cup |
Essential Kitchen Equipment
| Tool/Equipment | Purpose | Alternative Option |
|---|---|---|
| Mixing bowls (large and medium) | Used for combining ingredients, mixing dough, and ensuring a smooth batter. | Use any large bowls available in your kitchen. |
| Measuring cups (dry and liquid) | Essential for accurately measuring flour, sugar, butter, and other liquid ingredients. | Use a standard cup or other containers to approximate measurements. |
| Measuring spoons | Needed for precise measurement of small quantities like baking powder, baking soda, and extracts. | Use any small spoon from your cutlery set for rough estimates. |
| Stand mixer or hand mixer | Aids in thoroughly mixing ingredients and creaming butter with sugar for a smooth consistency. | Mix by hand with a whisk or wooden spoon, though it may require more effort. |
| Rubber spatula | Useful for scraping down the sides of bowls and transferring batter without waste. | A regular spoon or even a clean plastic/metal utensil can work in a pinch. |
| Wooden spoon | Great for mixing thicker batters and dough, ensuring even incorporation of ingredients. | Any sturdy kitchen spoon can serve as a substitute. |
| Baking sheets (2-3) | Required for placing cookie dough before baking. Allow for multiple batches to be prepared at once. | Use any flat oven-safe surface, like a pizza stone or a broiler pan. |
| Parchment paper or silicone mats | Prevent sticking and make cleanup easier, ensuring cookies bake evenly. | Grease the baking sheets lightly with butter or cooking spray if no alternatives are available. |
| Cookie scoop or spoon | Helps portion dough evenly, ensuring uniformly sized cookies for consistent baking. | Use two spoons to scoop dough or simply your hands, though this may be less precise. |
| Cooling rack | Allows baked cookies to cool evenly and prevents sogginess from steam. | Place cookies on a wire rack or another flat surface, allowing air to circulate. |
| Oven thermometer | Ensures that the oven is at the correct temperature for baking, preventing under or overbaked cookies. | Use a tried and tested method of checking doneness, such as timing and visual cues (golden edges, etc.). |
Cooking Steps
1. Mise en Place: Gather all ingredients, including gluten-free flour, unsweetened cocoa powder, baking soda, baking powder, salt, granulated sugar, brown sugar, unsalted butter (softened), eggs, peppermint extract, semisweet chocolate, white chocolate, and crushed candy canes. Measure out the specified quantities.
2. Preheat the Oven: Preheat the Oven to 175 °C (350 °F). Position the oven rack in the center.
3. Prepare Baking Sheets****: Line two baking sheets (approximately 44 cm x 30 cm/17 in x 12 in each) with parchment paper or silicone mats to prevent sticking.
4. Mix Dry Ingredients: In a large mixing bowl, whisk together 150 g (1½ cups) gluten-free flour, 45 g (½ cup) unsweetened cocoa powder, 1 tsp baking soda, ½ tsp baking powder, and ½ tsp salt until well combined.
5. Cream Butter and Sugars: In a separate large bowl, use a stand mixer fitted with the paddle attachment on medium speed to cream together 113 g (½ cup) unsalted butter and 100 g (½ cup) granulated sugar until light and fluffy, about 2-3 minutes.
Add 100 g (½ cup) brown sugar and continue mixing for 1 additional minute.
6. Add Eggs and Extract: Add 1 large egg and 1 tsp peppermint extract to the butter mixture. Mix on medium speed until fully incorporated, scraping down the sides of the bowl as needed.
7. Combine Wet and Dry Ingredients: Gradually add the dry ingredient mixture to the wet ingredients, mixing on low speed until just combined.
Don’t overmix; the dough should be thick and slightly sticky.
8. Portion Dough: Use a cookie scoop or spoon to portion the dough into equal-sized balls, approximately 30 ml (2 tbsp) each. Place the dough balls on the prepared baking sheets, spacing them about 5 cm (2 in) apart.
9. Bake Cookies: Bake the cookies in the preheated oven on the center rack for 10-12 minutes. The edges should be set, and the tops may look soft but will firm up as they cool.
Enjoy the aroma of chocolate and peppermint filling your kitchen.
10. Cool Cookies: Remove the baking sheets from the oven and let the cookies cool on the sheets for 5 minutes. Then, transfer them to a cooling rack to cool completely.
11. Melt Chocolate: While the cookies cool, prepare the chocolate drizzle. In a microwave-safe bowl, add 170 g (6 oz) semisweet chocolate. Heat in the microwave in 30-second intervals, stirring in between, until fully melted and smooth.
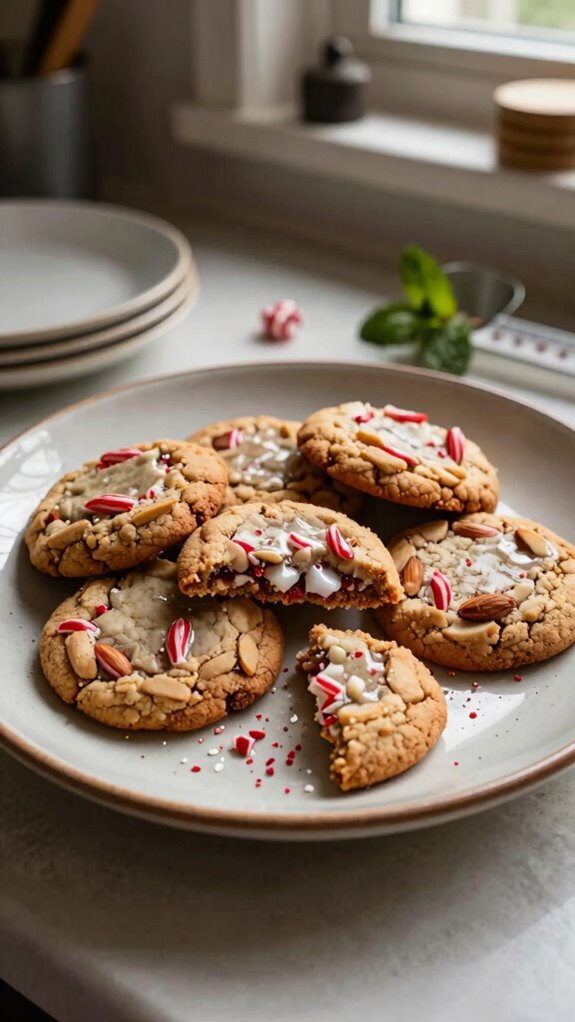
12. Drizzle and Garnish: Drizzle the melted chocolate over the cooled cookies using a fork or piping bag. Immediately sprinkle crushed candy canes on top while the chocolate is still wet.
13. Set Chocolate: Allow the chocolate to set at room temperature for about 30 minutes or until firm.
14. Serve: Once the chocolate has set, enjoy the cookies or store them in an airtight container.
Variations
- Dairy-Free Delight: Substitute unsalted butter with 113 g (½ cup) coconut oil and use dairy-free chocolate to make it completely dairy-free.
- Vegan Variation: Replace the egg with 60 ml (¼ cup) unsweetened applesauce and use a plant-based butter alternative along with dairy-free chocolate.
- Nutty Peppermint Bark: Add 100 g (1 cup) chopped pecans or walnuts to the dough for an added crunch and flavor enhancement.
- Chocolate Mint Swirl: Mix in 60 g (½ cup) of chocolate chips into the dough and top the cookies with melted chocolate mixed with a few drops of peppermint extract for extra flavor.
- Seasonal Pumpkin Spice: Incorporate 100 g (1 cup) of pumpkin puree and 1 tsp of pumpkin spice, omitting the cocoa powder for a seasonal twist.
- Coconut Chip Cookies: Fold in 100 g (1 cup) of shredded coconut into the dough for a tropical peppermint coconut flavor.
- Gluten-Free Oatmeal Mint Cookies: Substitute 75 g (¾ cup) of gluten-free flour with gluten-free oats for a chewy texture and a different flavor profile.
- Air Fryer Peppermint Bark Cookies: Prepare as usual and cook in the air fryer at 160 °C (320 °F) for 8-10 minutes for a faster, crispier cookie version.
Tips on plating and presentation
When it comes to showcasing those delicious gluten-free peppermint bark cookies, presentation can really elevate the experience.
I love using simple plating techniques like stacking cookies in a tiered arrangement or placing them on a festive plate.
For an extra touch, add some fresh mint leaves or colorful sprinkles.
These presentation tips not only look inviting but also enhance the overall enjoyment of your cookies!
What other dishes can I pair it with?
Have you ever thought about what dishes pair perfectly with gluten-free peppermint bark cookies?
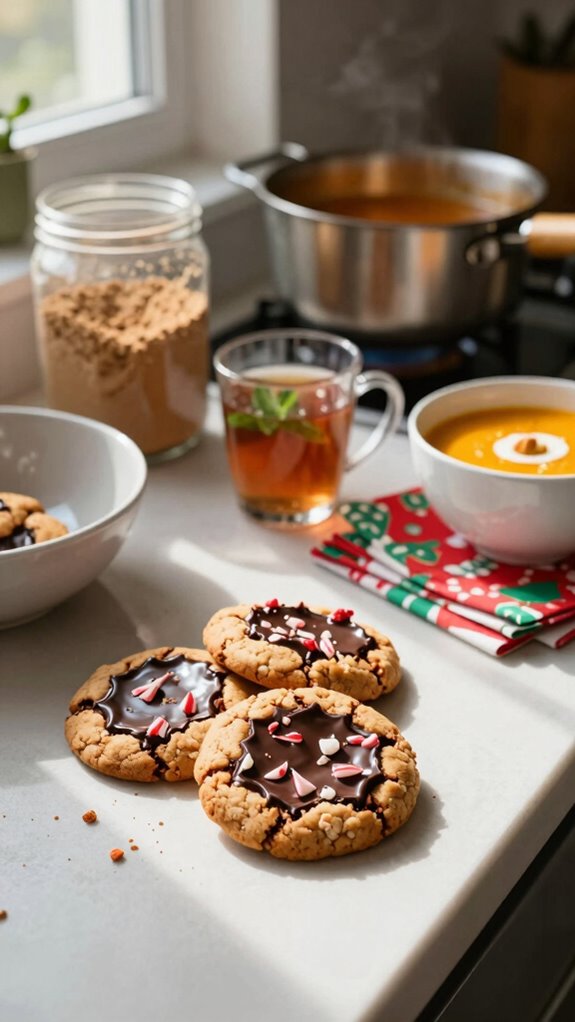
For holiday gatherings, I love serving them alongside creamy cheesecake or a rich chocolate mousse. They add a festive touch and balance nicely with the flavors.
You can also consider fruit tarts or even a warm apple crisp for some delightful dessert pairings that’ll impress your guests.
What drinks can I pair it with?

Pairing drinks with gluten-free peppermint bark cookies can elevate your dessert experience even more.
I love serving them with festive beverages like hot chocolate or a cozy spiced cider.
For something lighter, a refreshing peppermint tea makes the perfect pairing, balancing the flavors beautifully.
Whatever you choose, these drinks will enhance your treat, turning your dessert into a truly delightful moment.
Frequently Asked Questions
Can I Substitute Almond Flour With Another Gluten-Free Flour?
Absolutely! You can substitute almond flour with coconut flour or other gluten-free blends. Just remember, coconut flour absorbs more liquid, so you might need to adjust your recipe to get the right consistency.
How Should I Store Leftover Peppermint Bark Cookies?
I usually store leftover cookies in an airtight container. I’ve found it helps to use a glass or plastic container with a tight seal. This keeps them fresh and tasty for longer, using proper storing techniques.
Are There Any Dairy-Free Alternatives for This Recipe?
Absolutely! I love using dairy-free milk alternatives like almond or oat milk. For a coconut oil substitution, try using a dairy-free butter or even more coconut cream to keep it rich and delicious.
How Long Do These Cookies Last Once Baked?
These cookies typically last about a week when stored in an airtight container. For optimal cookie freshness, I recommend keeping them in the fridge; they’ll maintain their delicious taste and texture for longer that way!
Can Children Help Make This Cookie Recipe?
Absolutely! Kids can help make this recipe, making it a fun baking activity. Just remember baking safety—supervise them around hot surfaces and sharp tools. Together, we’ll create delicious memories and tasty treats!