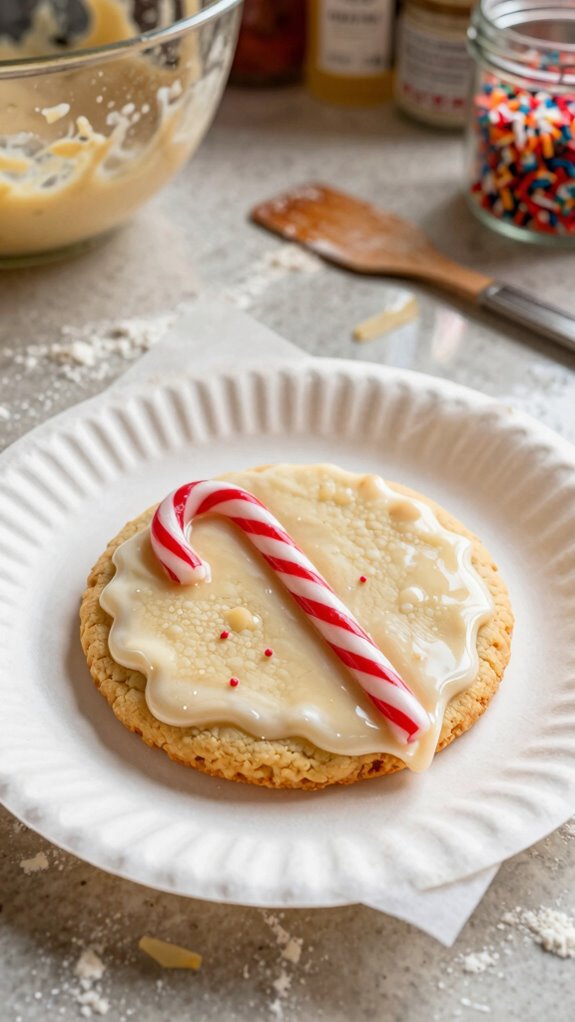
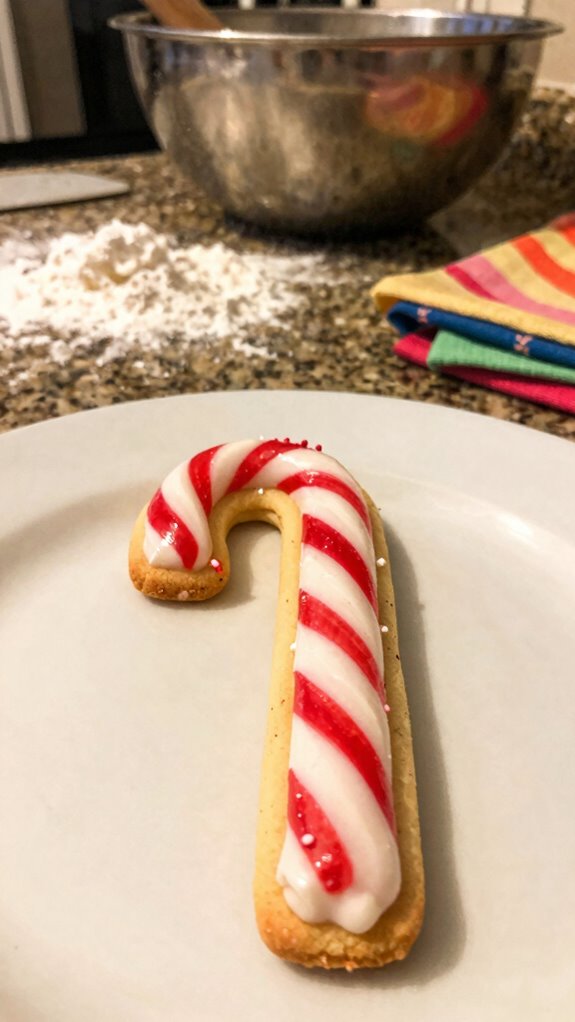
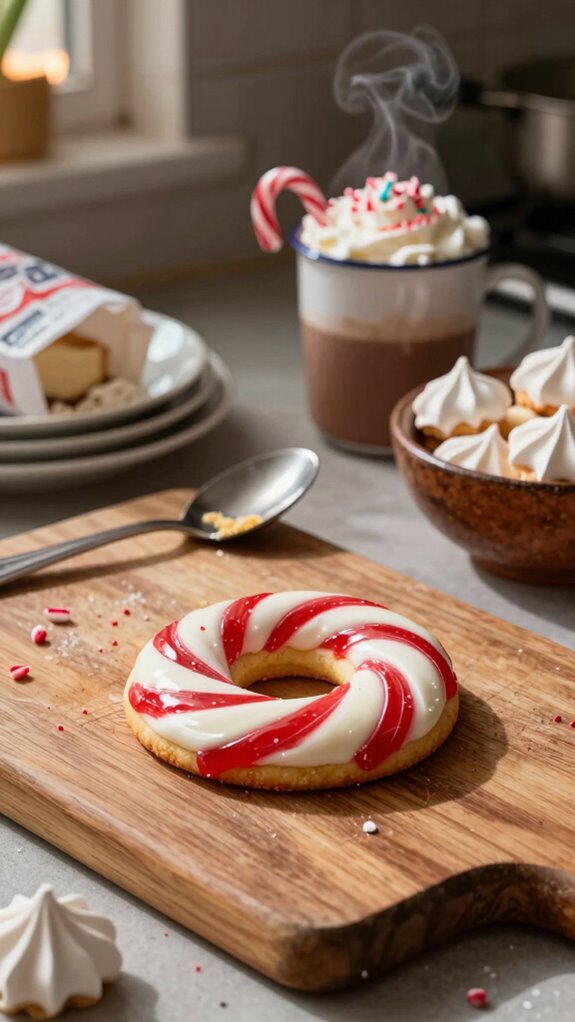
When I think of festive treats, Candy Cane Cookies with White Chocolate Dip always come to mind. These cookies blend the refreshing taste of peppermint with the smooth richness of white chocolate, creating a delightful experience. They’re soft, chewy, and topped with a satisfying crunch thanks to the crushed candy canes. If you’re curious about the easy steps to create these festive delights and how to elevate their presentation, you might find some interesting tips ahead.
What kind of recipe is it?
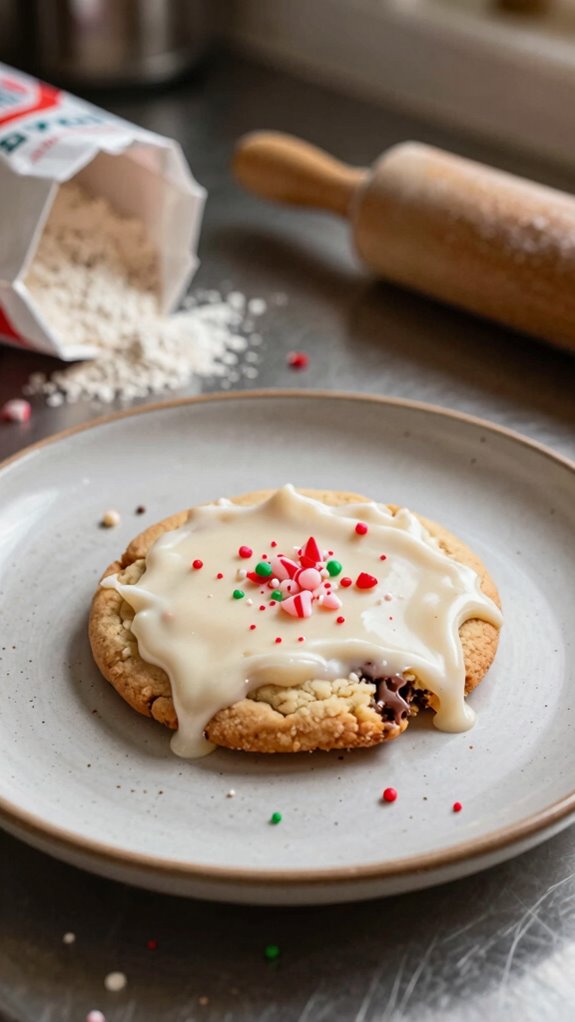
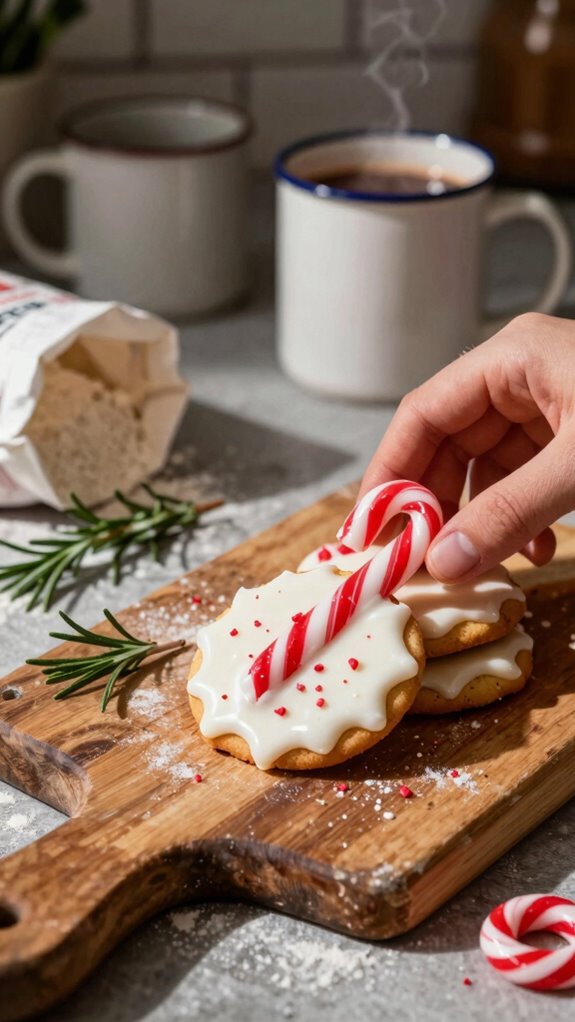
Candy Cane Cookie with White Chocolate Dip is a festive and delightful holiday treat that combines the classic flavors of peppermint and chocolate.
These soft, chewy cookies are enhanced by crushed candy canes, giving them a delightful crunch and a beautiful seasonal touch. Coating them in rich white chocolate not only adds a luxurious finish but also balances the minty taste.
Ideal for holiday gatherings, gifting, or cozy family moments, this recipe is perfect for bakers of all skill levels looking to spread seasonal cheer.
Preparation Time
| Attribute | Details |
|---|---|
| Difficulty of the Recipe | Easy |
| Preparation Time | 30 minutes |
| Number of Servings | About 24 cookies |
Ingredients
| Ingredient | Quantity |
|---|---|
| All-purpose flour | 2 1/4 cups |
| Unsweetened cocoa powder | 1/2 cup |
| Granulated sugar | 3/4 cup |
| Brown sugar | 1/2 cup, packed |
| Baking powder | 1 teaspoon |
| Baking soda | 1/2 teaspoon |
| Salt | 1/4 teaspoon |
| Unsalted butter | 1/2 cup (1 stick) |
| Large eggs | 1 |
| Peppermint extract | 1 teaspoon |
| Crushed candy canes | 1/2 cup |
| White chocolate chips | 1 cup |
Essential Kitchen Equipment
| Tool/Equipment | Purpose | Alternative Option |
|---|---|---|
| Mixing Bowls (Large & Medium) | Used for mixing dry and wet ingredients separately before combining | Any large plastic or glass bowls will work; even a large pot can serve as a mixing bowl |
| Measuring Cups (Dry & Liquid) | Essential for accurately measuring flour, sugar, and liquids like melted butter | Use standard cups or even graduated containers for approximate measurements |
| Measuring Spoons | Helpful for measuring small quantities of baking powder, baking soda, and extracts | Tablespoons and teaspoons from your regular kitchenware can be used for basic measurements |
| Stand Mixer or Hand Mixer | Aids in mixing dough and incorporating ingredients thoroughly (especially helpful for creaming butter and sugars) | Mixing by hand with a wooden spoon or whisk can be a budget-friendly alternative, though it may take longer |
| Rubber Spatula | Perfect for scraping down the sides of bowls and folding in delicate ingredients | A wooden spoon or even a plastic spoon can substitute, although not as effective for scraping |
| Wooden Spoon | Used for mixing and stirring dough and other ingredients together | Any sturdy spoon can work in place of a wooden spoon, but be cautious with heat resistance if mixing hot ingredients |
| Baking Sheets (2-3) | Provides a flat surface for placing cookies while they bake | Use any flat, oven-safe trays or even a cast-iron skillet if needed |
| Parchment Paper or Silicone Mats | Prevents cookies from sticking to baking sheets and allows for easy clean-up | Lightly greasing baking sheets with butter or oil can be an alternative, though it may affect cookie shape |
| Cookie Scoop or Spoon | Ensures that cookies are uniform in size for even baking | Use a regular spoon or your hands to shape cookie dough, but be cautious for size consistency |
| Cooling Rack | Essential for cooling cookies evenly after baking to maintain their texture | If not available, you can use the back of a baking sheet turned upside down or a plate for a temporary solution |
| Oven Thermometer | Ensures your oven is at the correct temperature for baking cookies | Trusting your oven’s built-in thermometer is an option, but be aware that they can sometimes be inaccurate |
Cooking Steps
- Begin by preparing your mise en place. Measure out 240 ml (1 cup) of unsalted butter, softened, and place in a mixing bowl. Measure and set aside 150 g (1 ¼ cups) of all-purpose flour, 120 g (½ cup) of powdered sugar, and additional flavoring such as 5 ml (1 teaspoon) of vanilla extract.
- Preheat your oven to 180 °C (350 °F). Position the oven rack in the center of the oven to ensure even heat distribution.
- In a large mixing bowl, using a stand mixer fitted with the paddle attachment (or a hand mixer), cream the softened butter at medium speed for about 2-3 minutes until light and fluffy.
- Gradually add the powdered sugar to the creamed butter while mixing on low speed to avoid dust.
- Once combined, increase the mixer speed to medium and mix for an additional 1-2 minutes.
- Add vanilla extract and mix until incorporated, about 30 seconds.
- Lower the mixer speed and slowly add the flour, mixing until just combined; avoid overmixing. The dough should be slightly sticky but hold its shape.
- Place prepared baking sheets (2-3) lined with parchment paper or silicone mats on a flat surface.
- Use a cookie scoop to portion out the dough, shaping each cookie to roughly 30 g (2 tablespoons) if using a spoon.
- Space cookies about 5 cm (2 inches) apart on the sheet to allow for spreading.
- Bake in the preheated oven for 10-12 minutes or until the edges are lightly golden but the centers appear soft.
- The cookies should have a slight sheen and aroma of butter and vanilla.
- Once baked, remove the cookies from the oven and allow them to cool on the baking sheets for 5 minutes before transferring them to a wire cooling rack.
- This step allows them to firm up slightly.
- Allow cookies to cool on the rack for at least 20 minutes before dipping in white chocolate.
- For the white chocolate dip, measure 200 g (7 oz) of white chocolate and place it in a heatproof bowl.
- Melt in the microwave in 30-second intervals at medium power (50%) stirring in between until smooth and fully melted.
- Dip the cooled cookies halfway into the melted white chocolate and then place back on the cooling rack or a parchment-lined tray to set.
- Allow the white chocolate to cool and harden at room temperature for about 15-20 minutes.
- Once set, the cookies can be stored in an airtight container at room temperature or refrigerated if you prefer a firmer chocolate coating.
- Enjoy your candy cane cookies as desired.
Variations
- Peppermint Candy Cane Twist: Add crushed peppermint candies (50 g / 1.75 oz) to the dough for a more pronounced peppermint flavor.
- Gluten-Free Delight: Substitute all-purpose flour with a gluten-free flour blend (150 g / 1.25 cups) to accommodate gluten sensitivities.
- Dairy-Free Variation: Use coconut oil (240 ml / 1 cup) instead of butter and dairy-free white chocolate (200 g / 7 oz) for a completely dairy-free option.
- Vegan Cookies: Replace butter with vegan margarine (240 ml / 1 cup) and use aquafaba (60 ml / ¼ cup) instead of egg for a plant-based version.
- Nutty Chocolate Dip: Incorporate almond extract (5 ml / 1 teaspoon) into the dough and top with chopped almonds (50 g / 1.75 oz) after dipping in white chocolate for added texture and flavor.
- Cocoa Swirl Cookies: Add 30 g (¼ cup) unsweetened cocoa powder to the flour mixture for a chocolatey twist on the classic cookie.
- Spiced Seasonal Variation: Incorporate ground cinnamon (5 g / 1 teaspoon) and nutmeg (2 g / ½ teaspoon) into the dough for a warm, festive flavor perfect for winter.
- No-Bake Version: Create a cookie dough ball mixture using oats (150 g / 1.5 cups), nut butter (120 g / ½ cup), and white chocolate chips.
Then refrigerate until firm for a quick, no-bake treat.
Tips on plating and presentation
When you’ve baked your delightful candy cane cookies and experimented with different variations, it’s time to think about how to serve them beautifully.
I love using elegant plating techniques like stacking cookies or arranging them in a colorful holiday-themed dish.
For presentation ideas, consider adding sprigs of mint or drizzling extra white chocolate on the plate to create a festive touch.
Enjoy!
What other dishes can I pair it with?
Whether you’re hosting a festive gathering or simply enjoying a cozy evening at home, pairing candy cane cookies with other dishes can elevate your dessert experience.
I love serving them alongside classic holiday treats like gingerbread or peppermint bark. For a delightful dessert pairing, consider a warm brownie or a rich chocolate tart—they complement the cookies perfectly and create a festive spread!
What drinks can I pair it with?
What drinks can bring out the festive flavors of candy cane cookies?
I love pairing them with hot chocolate for that classic sweet treat vibe.
Peppermint tea offers a cozy herbal touch, too.
If you’re feeling adventurous, try wine pairings like a fruity red or a sparkling white.
Festive cocktails, like a peppermint martini, can also enhance the holiday spirit.
Enjoy!
Frequently Asked Questions
Can I Use Dark Chocolate Instead of White Chocolate for Dipping?
Absolutely, I’ve used dark chocolate before for dipping, and it’s delicious! The rich flavor pairs beautifully with sweets, giving a nice contrast. You’ll love the extra depth it adds to your treats!
How Long Do These Cookies Stay Fresh?
These cookies stay fresh for about a week if stored properly. I recommend keeping them in an airtight container at room temperature. That way, you’ll enjoy their deliciousness for longer! Freshness tips can really help!
Can I Freeze the Cookie Dough?
Absolutely, I can freeze the cookie dough! Just ensure the dough consistency is right—smooth and well-mixed. Use suitable freezing methods, like wrapping it tightly, to keep it fresh for later baking. Enjoy!
Are There Gluten-Free Options for This Recipe?
Yes, there are gluten-free options for this recipe! I’ve used gluten-free flour blends successfully as ingredient substitutions, ensuring a tasty cookie. Just make sure to check your other ingredients for gluten content, too.
What Is the Best Way to Store Leftover Cookies?
The best storage for leftover cookies is using airtight cookie containers. I usually stack them with parchment paper between layers to keep them fresh and prevent sticking, extending their deliciousness for days!