I’ve recently been experimenting with gluten-free baking and came across a delightful recipe for Peppermint Chocolate Thumbprint Cookies. These soft, chewy treats perfectly balance rich chocolate and refreshing peppermint. As I prepared them, I discovered just how versatile they can be, making them ideal for holiday gatherings. But there’s more to these cookies than meets the eye, especially when it comes to their presentation and pairing options. Let’s explore this further.
What kind of recipe is it?
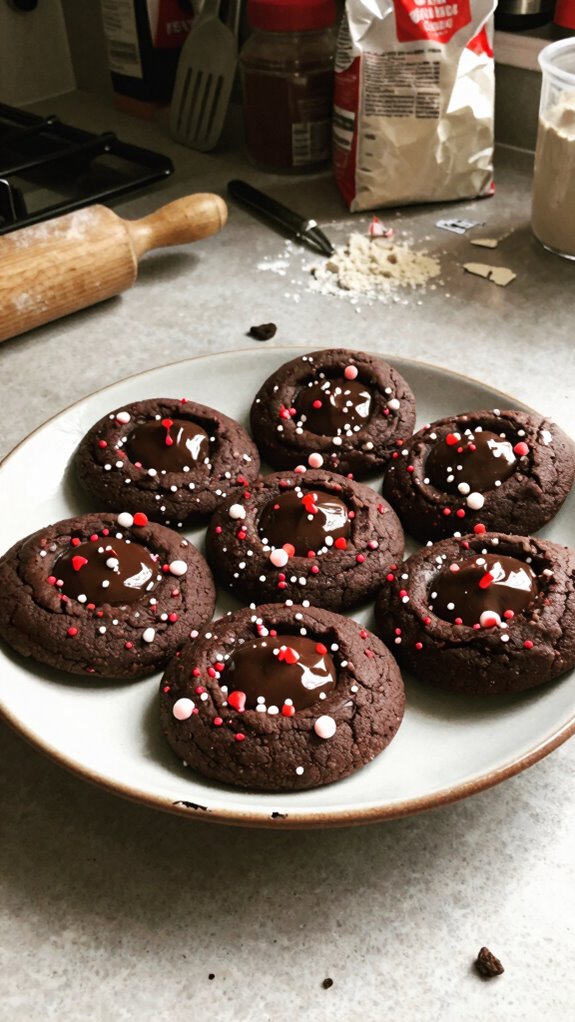
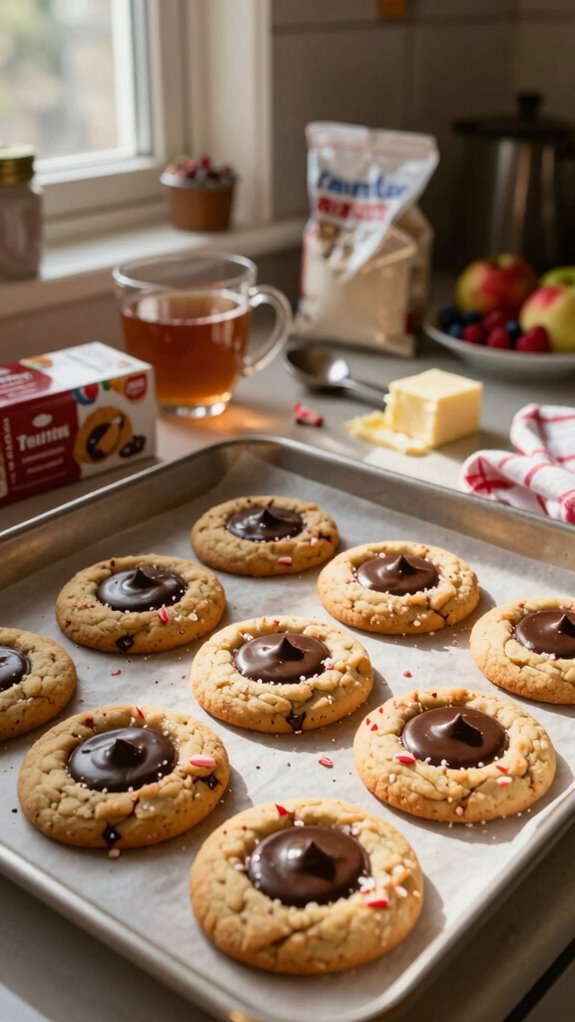
Peppermint Chocolate Thumbprint Cookies are a delightful treat that combines the rich flavor of chocolate with the refreshing essence of peppermint, making them a perfect dessert for the holiday season.
These cookies feature a soft, chewy texture, with a decadent chocolate center that’s often filled with peppermint-infused ganache or frosting, providing a vibrant pop of flavor.
Ideal for baking enthusiasts, holiday gatherings, or gifting, these cookies not only satisfy sweet cravings but also add a festive touch to any occasion.
Preparation Time
| Recipe Detail | Description |
|---|---|
| Difficulty of the Recipe | Intermediate |
| Preparation Time | 30 minutes (plus cooling time) |
| Number of Servings | Approximately 24 cookies |
Ingredients
| Ingredient | Quantity |
|---|---|
| All-purpose flour | 2 cups |
| Unsweetened cocoa powder | 1/3 cup |
| Baking powder | 1/2 teaspoon |
| Salt | 1/4 teaspoon |
| Unsalted butter | 1 cup (softened to room temperature) |
| Granulated sugar | 3/4 cup |
| Brown sugar | 1/4 cup |
| Large eggs | 1 |
| Vanilla extract | 1 teaspoon |
| Peppermint extract | 1/2 teaspoon |
| Semisweet chocolate chips | 1 cup (for filling) |
| Optional: Crushed peppermint candies | 1/4 cup (for topping) |
Essential Kitchen Equipment
| Tool/Equipment | Purpose | Alternative Option |
|---|---|---|
| Mixing Bowls (Large & Medium) | Used for combining ingredients in different stages of the recipe. | Sturdy large pot or deep dish can be used. |
| Measuring Cups (Dry & Liquid) | Essential for accurately measuring dry ingredients and liquids. | Use a kitchen scale (for weight) or household measuring cups if precision isn’t critical. |
| Measuring Spoons | Needed for measuring smaller quantities of ingredients like extracts. | Regular teaspoons can be used when precision is less critical. |
| Stand Mixer or Hand Mixer | Ideal for creaming butter and sugars efficiently and evenly. | Whisking by hand with a strong arm may work, but it will take longer. |
| Rubber Spatula | Great for scraping down sides of bowls and folding in ingredients. | Use a wooden spoon or even a clean hand. |
| Wooden Spoon | Good for stirring thicker mixtures and incorporating ingredients. | Any sturdy spoon can suffice, such as a silicone or plastic spoon. |
| Baking Sheets (2-3) | Required for placing cookies in the oven to bake evenly. | Any flat, oven-safe tray can be used, though baking sheets provide better circulation. |
| Parchment Paper or Silicone Mats | Prevents cookies from sticking to baking sheets; aids in easy cleanup. | Lightly greased baking sheets or using aluminum foil can work as substitutes. |
| Cookie Scoop or Spoon | Useful for portioning cookie dough evenly for consistent baking. | Two spoons can be used to scoop the dough instead, though this may result in uneven sizes. |
| Cooling Rack | Allows cookies to cool down evenly after baking to prevent sogginess. | A large plate or countertop can work, but may not cool as efficiently. |
| Oven Thermometer | Ensures that your oven is at the accurate temperature for baking. | Using the built-in oven temperature gauge, but it may not be entirely accurate. |
Cooking Steps

6. Combine Dry Ingredients: In a separate medium bowl, whisk together 300 g (2 1/2 cups) of all-purpose flour, 30 g (1/4 cup) of cocoa powder, and 1/4 tsp salt until evenly blended.
7. Combine Wet and Dry Mixtures: With the mixer on low speed, gradually add the dry ingredient mixture to the butter mixture, mixing just until combined and a soft dough forms.
Don’t overmix; stop as soon as there are no dry patches.
8. Chill Cookie Dough: Cover the dough with plastic wrap and chill in the refrigerator for about 30 minutes to firm up, aiding in rolling and shape retention during baking.
9. Form Cookies: After chilling, remove the dough from the refrigerator. Using a cookie scoop or two spoons, portion out the dough, forming balls roughly 25 g (1 inch) in diameter.
Place them evenly spaced on the prepared baking sheets.
10. Make Thumbprint Indentations: Using your thumb or the back of a measuring spoon, gently press down in the center of each dough ball to create a well. This will hold the chocolate filling later.
11. Bake Cookies: Place one baking sheet in the preheated oven on the center rack. Bake for 12–15 minutes, until the edges are set, and the tops appear slightly cracked but still soft.
Cookies shouldn’t be browned. Remove from oven and allow to cool on the baking sheet for about 5 minutes.
12. Melt Chocolate: While cookies cool, melt 100 g (3.5 oz) of semisweet chocolate in a heatproof bowl set over a pot of simmering water (double boiler method) for about 5–7 minutes, stirring occasionally until smooth.
Alternatively, microwave the chocolate in 30-second intervals, stirring between each until fully melted.
13. Fill Indentations: Carefully use a small spoon to fill each thumbprint indentation with the melted chocolate.
Allow the filled cookies to set at room temperature or refrigerate briefly if needed for the chocolate to solidify.
14. Cool Completely: Once the chocolate has set, transfer the cookies to a cooling rack to cool completely, about 15–20 minutes.
15. Serve and Enjoy: These Peppermint Chocolate Thumbprint Cookies can be enjoyed immediately or stored in an airtight container at room temperature for up to one week.
Variations
- Mint Chocolate Chip: Add 100 g (1 cup) of mint chocolate chips to the dough for an extra burst of minty flavor.
- Peanut Butter Swirl: Incorporate 100 g (1/2 cup) of creamy peanut butter into the dough for a nutty taste; swirl a little extra peanut butter into the chocolate filling for added richness.
- Gluten-Free Alternative: Substitute all-purpose flour with 300 g (2 1/2 cups) of a gluten-free baking blend to accommodate gluten sensitivity.
- Dairy-Free Delight: Use dairy-free chocolate and replace butter with 150 g (2/3 cup) of coconut oil or vegan butter for a dairy-free version.
- Vegan Twist: Replace eggs with 50 g (1/4 cup) of unsweetened applesauce and use coconut oil instead of butter for a completely vegan cookie.
- Seasonal Spice: Add 1 tsp of ground ginger or cinnamon to the dry ingredients for a warm, spiced variation suitable for the holidays.
- Baking Method: Experiment with no-bake cookies by chilling the formed dough balls and coating them with melted chocolate without baking.
- Chocolate Variations: Use white chocolate or dark chocolate instead of semisweet chocolate for different flavor profiles in the filling.
Tips on plating and presentation

How can you elevate your peppermint chocolate thumbprint cookies for a stunning presentation?
I suggest using simple plating techniques, like stacking them in a pyramid, garnishing with crushed candy canes, or drizzling melted chocolate over the top.
For presentation ideas, consider placing them on a decorative platter with festive accents or surrounding them with fresh mint leaves for a vibrant touch.
What other dishes can I pair it with?
When you’re thinking about what to pair with your peppermint chocolate thumbprint cookies, you can’t go wrong with a selection of holiday-themed treats.
I love to create cookie platters featuring nutty shortbread, classic gingerbread, and rich chocolate crinkles.
These dessert combinations not only complement the cookies perfectly but also make for an inviting and festive display that everyone can enjoy.
What drinks can I pair it with?

To fully enjoy your peppermint chocolate thumbprint cookies, I recommend pairing them with a warm cup of peppermint tea or a rich hot chocolate.
If you’re hosting a happy hour, consider serving them alongside festive beverages like mulled wine or creamy eggnog.
These combinations elevate the flavors and turn an ordinary snack into a delightful holiday experience you won’t forget!
Frequently Asked Questions
Can I Use a Different Type of Chocolate?
Absolutely! I enjoy using dark chocolate for a rich flavor, or white chocolate for a sweeter touch. Both alternatives work well, so it’s all about your preference. Experiment and find what excites your taste buds!
How Should I Store Leftover Cookies?
I store my leftover cookies in an airtight container to keep them fresh. This helps extend their shelf life, ensuring I can enjoy them longer without sacrificing flavor or texture.
Are There Dairy-Free Options for This Recipe?
Absolutely! I’ve found some great dairy-free alternatives like coconut oil or dairy-free chocolate chips. If you’re looking for plant-based options, almond or oat milk also works well in the recipe. Enjoy your baking!
Can These Cookies Be Frozen?
Yes, I can freeze these cookies! For freezing tips, store them in an airtight container. When you’re ready to enjoy, use thawing methods like leaving them at room temperature for a couple of hours.
What Is the Best Way to Substitute Eggs in This Recipe?
I love using flaxseed meal mixed with water or applesauce as egg substitutes. For one egg, I blend one tablespoon of flaxseed meal with three tablespoons of water or use a quarter cup of applesauce.